Andre’s Eaglesoft Predetermination Process - Start to Finish

How Andre does Predetermination / Preauthorization Process start to Finish
To create a Pre-D/Pre-Auth you start with a Treatment Plan.
To create a Treatment Plan you can:
Option 1: Create Treatment Plan from Charted Proposed Treatment in the Odontograph (“Chart”)
Click the “TX Plan” button at the bottom of the Chart
If this is the first plan for this Patient you will get a pop-up warning that “No Plan Exist” for this Patient. Click “Yes” to create a new Tx Plan.
You will get a dialog box prompting for a Description. I suggest that you enter a description of the plan like “Implants on Lower arch” or “Restore Anterior Smile” and NOT a Date as I have seen in some offices. This long-term issue I have found is that If a Patient has more than one treatment plan, it’s difficult to differentiate one plan from another if the plans have dates for Descriptions (more information below in step 7).
You can enter Notes in this dialog box. Those notes will only appear in the Notes area on the Presentation View of a Printed Treatment Plan.
Next you will see a Pop-up window listing ALL Proposed Services. You can pick and chose service to add to this Treatment Plan and use the Use Selected Services button.
With the Services added to this Treatment Plan, you can then select the Process button.
Within the next Pop-up you can select the Print / Submit Pre-Authorization box and select Treatment Plan you want to submit. This is why I suggest a clear Description and not a Date as you have to “know” which plan you want to submit.
Select OK and within the next pop-up window choice your method of submission (Print, eClaim, Manually) and indicate if there are images that will be attached.
Option 2: Create Treatment Plan from direct entries on the Treatment Plan screen
Click the “TX Plan” button from your Toolbar
If this is the first plan for this Patient you will get a pop-up warning that “No Plan Exist” for this Patient. Click “Yes” to create a new Tx Plan.
You will get a dialog box prompting for a Description. I suggest that you enter a description of the plan like “Implants on Lower arch” or “Restore Anterior Smile” and NOT a Date as I have seen in some offices. This long-term issue I have found is that If a Patient has more than one treatment plan, it’s difficult to differentiate one plan from another if the plans have dates for Descriptions (more information below in step 7).
You can enter Notes in this dialog box. Those notes will only appear in the Notes area on the Presentation View of a Printed Treatment Plan.
Next you will see a Pop-up window listing ALL Proposed Services. You can pick and chose service to add to this Treatment Plan and use the Use Selected Services button. If no treatment has been proposed you can manually enter Service Codes.
With the Services added to this Treatment Plan, you can then select the Process button.
Within the next Pop-up you can select the Print / Submit Pre-Authorization box and select Treatment Plan you want to submit. This is why I suggest a clear Description and not a Date as you have to “know” which plan you want to submit.
Select OK and within the next pop-up window choice your method of submission (Print, eClaim, Manually) and indicate if there are images that will be attached. Remember that in 2021 the Delta Dental Provider Manual states: “Narratives as documentation are not considered legal entries nor are the contemporaneous in nature. The patient record/clinical notes are considered a legal document and are considered contemporaneous. The only acceptable legal written documentation for utilization review are the contemporaneous treatment notes.” In other words, “narratives” will no longer be accepted and only Progress Notes (“clinical documentation") from the Date of Service will be considered as a description of the procedure or necessity for treatment.
When the Pre-D/Pre-Auth comes back from the Insurance Company, you should do the following:
Click on the Treatment Plan icon on your toolbar
Use the drop-down arrow next to the Description field select the Treatment Plan you will be working on (if you have multiple plans).
On each Service line, highlight, right click and select More information.
In the Estimated Primary field enter the “approved” mount as per the Pre-authorization.
Click the “Insurance Amount(s) Approved” box at the bottom of the dialog box. Service that are marked “approved” will turn “red” in the listed of Services in the Treatment Plan.
After you are finished with each line, Select Process. Then OK to Save your approval Process.
Scan the Pre-D/Pre-Auth form into Eaglesoft Advanced Imaging an attach to the associated tooth number(s) for storage and retrieval. (more information is here www.thecrewprocess.com/eaglesoft-blog/scanning)
OPTIONAL: create an Admin Code to include in your Treatment plan that will hold the Pre-Auth number. It will then be included in your Account History. Make sure to select “Allow for Free Form Description” so you can edit the Description and enter the Preauthorization number (see pic).

When the treatment that was Pre-authorized is completed
Post Proposed Services to Walkout and Submit claim
When you get to the Claim Submission window under the “Print Now Print Later Submit Electronically…” choices there is a dialog box to enter the Preauthorization number that was provided on the Pre-D/Pre-Auth form. (see pic)

3. Process the Pre-D/Pre-Auth like you would any eclaim. There is NO need to for any attachment(s) as they were included in the approval process.
Although this is the process I recommend to users who see Pre-D/Pre-Auth. I personally stand by the philosophy that “Why would we use a tool for our patients that does not guarantee payment and slows the process of delivering exceptional care?” What happens if Services are Walked out and the Pre-D/Pre-Auth doesn’t close (still shows in the Outstanding Claims window)?
From the Toolbar, click the Claims icon. Filter down to show only Primary/Secondary Pre-Authorizations and those that are Open. (see pic)
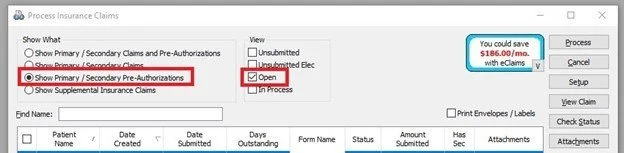
2. Click the box next to the Claim and select the Close Claim button on the right.
DISCLAIMER:
This is a resource guide and all decisions on each dental office setup should remain the sole decision of the dentist/owner of the practice. Eaglesoft is a registered trademark of Patterson Dental Company. All other software or products mentioned are the property of their respective owners. Although Andre Shirdan was an employee of Patterson Dental, he is not associated with Eaglesoft or Patterson Dental Company or endorsed by Patterson or any other Company Mentioned in this blog
